Thursday, March 31, 2011

Pinkalicious Cupcakes

We are big Pinkalicious fans in my house! We have all the books, including the newest one, Silverlicious. It is such a cute book, with a great storyline! When I found this recipe for the Pinkalicious cupcakes I knew I had to make them! Check out http://www.thinkpinkalicious.com/ for more fun pinkalicious activities (as well as the actual recipe). The website is just as cute as the books! :)

Getting to the cupcakes...These were very easy and fun to make. Make sure to recruit little helpers for this one. They will love adding the 20 drops (or more) of food coloring as well as the decorating part of the cupcake. The pink definitely makes everything more fun as do the sprinkles and whatever else you decide to add. Pink not your color? Substitute for a different color! I think next time we're going for blue cupcakes. The possibilities are endless...have fun!

Pinkalicious Cupcakes
1/2 cup unsalted butter, softened
3/4 cup sugar
2 large eggs
2 teaspoons vanilla
1 1/2 cups all-purpose flour
1/2 teaspoon baking powder
1/2 teaspoon salt
2/3 cup milk
pink food coloring (I used McCormick)

1. Preheat oven to 350 degrees and line a muffin tin with paper liners.
2. In a large size bowl, use an electric mixer to beat the butter and sugar together until it's light and fluffy. Add the eggs, one at a time, beating the mixture well after each egg. Then add the vanilla.
3. In a medium size bowl, combine the flour, baking powder, and salt.
4. Gradually add the flour mixture and milk using a wooden spoon or rubber spatula to the wet mixture and combine thoroughly.
5. Add 20 drops of food coloring to the batter and stir.
6. Evenly fill the liners with batter and bake for 18-24 minutes, or until a toothpick inserted in the center comes out clean. Remove the cupcakes from the muffin tin and cool completely on a wire rack.

Buttercream Frosting
3 1/2 cups confectioners sugar
1/2 cup unsalted butter, softened
2 teaspoons vanilla extract
1/4 cup milk (or water)
pink food coloring

1. Combine the confectioners sugar, butter, vanilla and milk in a medium size bowl and beat with an electric mixer until smooth and creamy. Mix in a few drops of pink food coloring into the frosting to create the perfect shade of pink.
2. After the cupcakes have completely cooled, decorate the cupcakes with frosting. And, of course, sprinkles or candy (I used pink cake sparkles and tip 12 to pipe the frosting).
**I prefer to use water when making the frosting, that way I don't have to worry about refrigerating the cupcakes. Also, I did not use 1/4 cup water...I used my teaspoons and measured very small amounts until I reached my desired consistency.

A few things about this recipe...First, it only makes 12 cupcakes and enough frosting to frost those 12 cupcakes. Second, the cupcake itself is very good, but not very sweet. However, the frosting makes up for that! The cupcakes are moist, but not nearly as light as a cupcake made from a box cake mix. If I was making these for a large group of kids, I would probably use a box mix and just add the food coloring. However, for a smaller group of kids this recipe is perfect...or if you're just in the mood to make cupcakes.

Monday, February 28, 2011

Soldier Cupcakes

For my son's birthday this year, it was all about soldiers, military, GI Joe. In keeping with that theme, we decided on soldier cupcakes. These were the easiest, most fun cupcakes I've decorated to date. I made my usual buttercream frosting and colored it using two different greens from Wilton. I started with Leaf Green, but didn't like the green it was turning into, so I added Juniper Green to it and luckily it turned into the green I was hoping for. Then I used Wilton tip 233 to make the blades of grass. This was my first time working with this tip and I had so much fun using it. I love that it doesn't have to have a perfect look, so it doesn't really matter how experienced of a decorator you are. The tip itself creates a really cool look and is easy to use. It took a little bit of time to pipe the grass onto each cupcake, but nothing too involved. I bought the little plastic soliders awhile ago, specifically for my son's cake/cupcakes, and they worked perfect. I was really happy with how these turned out and so was the birthday boy!


Tuesday, February 22, 2011

Heart Healthy Cupcakes

These are not my standard cupcakes that I usually make, topped with a ridiculous amount of frosting, but they are equally as good and significantly healthier. I found this recipe in a Family Fun Magazine quite a few years ago. I remember liking them, but had not made them in so long. In an effort to be healthier, I decided to make them the other day, only this time I made some changes (healthier changes) and I couldn't be happier with the result. So happy in fact, the cupcakes were gone within 2 days and not only did I love them, but my kiddos did as well. Here is my adapted version of the recipe:

Heart Healthy Cupcakes
1 cup (8 ounce can) crushed pineapple in its own juice
1 1/2 cups whole wheat flour
1 1/2 cups flour
1 1/2 cups sugar
1 teaspoon baking soda
1 teaspoon baking powder
1 teaspoon salt
2 teaspoons cinnamon
2 large eggs
1 egg white
1/2 cup vegetable oil
1/2 cup honey
2 teaspoons vanilla extract
2 cups coarsely shredded carrots
1/2 cup unsweetened applesauce

Heat the oven to 350 degrees. Drain the pineapple and reserve the juice. In a large bowl, whisk together the flour, sugar, baking soda, baking powder, salt and cinnamon. Make a well in the center of the mixture and drop in the eggs, egg white, oil, honey, vanilla extract, and reserved pineapple juice. Beat at medium speed until blended, about 1 1/2 minutes. With a spoon, stir in the crushed pineapple, shredded carrots, and applesauce. Then spoon the batter into paper baking cups set in muffin tins. Bake until a toothpick stuck in the center of a cupcake comes out clean, about 22 minutes. Remove pan from oven and cool on a wire rack for 2 minutes. Serve warm or cool...either way, they are fantastic!

**I just recently started substituting honey for sugar whenever possible. This is the first time I tried it with this recipe and I really liked using the honey. I couldn't tell a difference. Here is a great link if you're interested in substituting honey into more of your baking. It's a healthier alternative to sugar.

Wednesday, January 26, 2011

Mac 'n Cheese Cupcakes

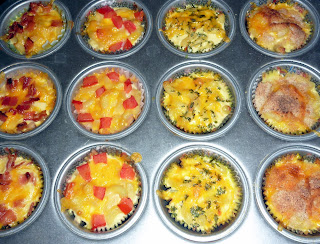
Cupcakes for dinner, why not? Okay, so this isn't your typical cucpake...it's a mac 'n cheese cupcake and it's perfect for dinner, especially if you have kiddos. I have to be honest, though, it has taken me a few times to perfect this recipe to my kids' liking. I love this recipe for many reasons: it's super easy to make, most/all of the ingredients you probably have on hand, it is possible to make this entire recipe while holding a 25 pound sack of potatoes (baby girl), it's much tastier and healthier than the box mac 'n cheese, and you can customize it to everyone's liking.

The first time I made these I didn't add nearly enough salt and pepper and they were very bland. The next few times, they were much better, but still seemed to be missing something. Tonight, I feel like I nailed it...finally! I decided to top the cupcakes with something different for each of my children. For my baby girl, I topped hers with tomatoes. For my little man, I topped his with bacon (He LOVES bacon!) and for my older girl, I topped hers with parsley...because it's fancy and she likes fancy. And for mine, I decided to go with breadcrumbs. Everyone loved having their very own cupcake that was created just for them. It definitely added a little something extra by adding the toppings. I tried the tomato, bacon and breadcumb cupcakes and I couldn't decide which was my favorite. They were all so good! I'm already thinking about what I can top them with next...any fun, crazy ideas?

Mac 'n Cheese Cupcakes (adapted from Framed Cooks)
8 oz. elbow macaroni
2 cups shredded cheddar cheese, plus a little more for garnish
2 eggs
1 cup milk
Salt and Pepper
Diced tomatoes, bacon, breadcrumbs, parsley for toppings (optional)

1. Preheat oven to 400 degrees. Line a 12 cup muffin tin with paper or foil liners.
2. Cook the macaroni until done. Drain and immediately return to pot.
3. Add cheese and stir briefly, until almost melting.
4. Beat eggs into milk (add salt and pepper), and then pour mixture into macaroni. Mix well.
5. Ladle macaroni mixture into muffin tins. Sprinkle with remaining cheese and add toppings, if desired. Bake for 20 minutes. Cool slightly before serving.

Wednesday, January 12, 2011

Happy New Year!

I was hoping to have some fab New Year's cupcakes on here, but unfortunately, I haven't had time to make any. I do have some new recipes I am really anxious to try and share. Until then, here are a few posts I think you might like.

I have been wanting to make these for soooooo long! Sweet and salty....it just doesn't get any better! Wait, a sweet and salty cupcake....maybe?

Do you need a good laugh? Check out this post my friend Jamie did on her family's worst pics. It is seriously funny and guaranteed to make you laugh!

How cute is this checkerboard and this headband? I've been wanting to make both of these, but never have quite enough time (or all of the supplies...oh, how I miss Michaels!).

Looking for a great mac 'n cheese recipe? Look no further!

Here's wishing everyone a happy and healthy New Year! No matter how crazy and hectic the year may get, try to remember to stop and smell the roses...or in this case, poinsettias!

Tuesday, December 21, 2010

Mini Candy Jars

Ever since I was a little girl, I have always enjoyed making little gifts for people. Nothing fancy or expensive, just simple and sweet. Mostly, I made them for my great grandmas and great aunts. My mom was always helpful and supportive when it came to me wanting to make something. Now as an adult, I have found that I still enjoy doing this....only now, with my children. Last year, we made these hot cocoa cones. They were a lot of fun and super easy to make. This year, we decided to make these little candy jars with recycled baby food jars (*Never throw out baby food jars. They can be used for so many things!). I think they turned out pretty cute. :)

You will need:


baby food jars with lids (any size)
spray paint (your color choice)
kids paint (Crayola makes a great paints)
paintbrush (fine tip works best)
ribbon/rafia
candy

First, spray paint your lids. Depending on the color, you may need another coat. While the lids are drying, get your kiddos ready to paint. We started with the snowman and used their fingertips for the body. While that was drying, we moved on to something else. My daughter chose a wreath and Christmas tree and my son chose hot cocoa with marshmallows (I like his thinking!). The only thing I really helped them with were the snowmen. When all was finished, we added little white dots for snow. When the jars were finished drying, we added the candy, put the lid on and added a little bow...voila! A cute little Christmas jar filled with your favorite holiday candy.

My daughter really enjoyed this activity. It definitely involved patience. My son started out great, but towards the end was ready to be finished. I always love seeing their paintings and drawings. There is just something about kid artwork that makes my heart happy. It is just so sweet and full of life. I love it!

Monday, December 13, 2010

Red Velvet Cupcakes

Up until the other day, I had never made red velvet cupcakes. I tried one once and wasn't too crazy about it. However, when I came across this recipe for white chocolate peppermint cream cheese frosting, this was the cupcake that accompanied it...so, I decided that it was time to give red velvet cupcakes another chance. And, I'm so glad I did! They were delicious and oh, so pretty! Perfect for the holidays!! On top of that, they were very easy to make. So, grab your baking partner (my 7 year old daughter fit the job description) and get started.

Red Velvet Cupcakes (Recipe from Anne Byrn)
1 box plain German chocolate cake mix
1 package (3.4 oz) instant vanilla pudding mix
1 cup sour cream (you can use light if you so desire)
1/2 cup water
1/2 cup vegetable oil
1 bottle (1 oz) red food coloring
3 large eggs
1 cup miniature chocolate chips

1. Preheat oven to 350 degrees. Line cupcake pan with liners.
2. Place the cake mix, pudding mix, sour cream, water, oil, food coloring, and eggs in a large mixing bowl. Blend on low for 30 seconds and then increase to medium speed and mix for an additional 4-5 minutes, scraping down sides of bowl as necessary. Fold in chocolate chips. Your batter should be a beautiful red color. Spoon 1/3 cup batter into each cup, filling it 3/4 of the way full. You will get between 22-24 cupcakes. Place the pan in oven and bake for 18-20 minutes or until a toothpick inserted in the center comes out clean.
3. Remove pan from oven and allow to cool on wire rack for 5 minutes. Carefully remove cupcakes from pan and allow to cool completely before frosting.

White Chocolate Peppermint Cream Cheese Frosting
6 ounces white chocolate, coarsely chopped
4 ounces cream cheese, softened
4 tablespoons (1/2 stick) butter, softened
1 teaspoon peppermint extract
2 to 2 1/2 cups confectioners sugar, sifted
Candy canes (optional)

1. Place the white chocolate in a small glass bowl in the microwave oven on high for one minute. Remove the bowl from the oven and stir with a wooden spoon or rubber spatula until smooth. Set the chocolate aside to cool.
2. Place the cream cheese and butter in a large mixing bowl. Beat with an electric mixer on low speed until well combined, 30 seconds. Add the melted white chocolate and blend on low speed until just combined, about 30 seconds. Add the peppermint extract and 2 cups of the confectioners sugar and blend on low speed until the sugar is incorporated, 30 seconds more. Increase mixer speed to medium and mix an additional minute or until frosting is fluffy (adding 1/2 cup more sugar if needed).
3. Frost cupcakes as desired. I decided to add chopped candy cane to the frosting before I frosted the cupcakes. It added a nice touch to the cupcakes and I liked the crunch effect when biting into the cupcake.
**If you are piping the frosting on the cupcakes I recommend doubling this recipe. I did not have enough frosting for all 24 of my cupcakes. You use more frosting when piping versus using a spatula. I also wish I would have had extra white chocolate to put chocolate shavings on the top. You really can do all sorts of fun combinations with this cupcakes. My daughter liked putting the candy canes right on top. I used Wilton tip 2A for piping these cupcakes.