Tuesday, November 29, 2011

Brownie Cupcakes

I just made these cupcakes for Thanksgiving. I know they are not your typical Thanksgiving dessert, but I wanted to make something that I knew my kids would love (Don't worry, I made pumpkin pie too). They always pretend they like pumpkin pie, but I know better. They put on a pretty decent act, which I appreciate, but this year I wanted them to have something they would truly enjoy. So, I decided to make them cupcake brownies. These are quite possibly the easiest cupcakes to make and very fun because you can add your own toppings and be as creative as you would like. I also like that the recipe only makes 12...the perfect amount for us!

Brownie Cupcakes
1 package brownie mix
1/2 cup canola oil
1/4 cup cranberry juice
2 large eggs
Toppings: chocolate chips, sprinkles, marshmallows, candycanes, pretzels, etc.
Powdered sugar (optional)
**I used mini chocolate chips, chocolate covered pretzels (coursely chopped), m&m's, and sprinkles.

1. Stir together first 4 ingredients until smooth. Spoon batter into muffin pan lined with paper/foil liners. Sprinkle with desired toppings. Batter will evenly fill 12 muffin cups.

2. Bake at 350 degrees for 20-25 minutes or until a wooden pick inserted in center of cupcakes comes out clean. Remove from pan, and cool on a wire rack. Sprinkle with powdered sugar, if desired.

Wondering what to do with all that leftover cranberry juice? Stay tuned for a very festive beverage recipe that is a favorite amongst our nation's top military leaders....don't ask me how I know this. Until then, go make the brownie cupcakes and eagerly await for this top secret recipe! :)

Friday, October 21, 2011

Nutella Acorns

For those of you who are still readers of this blog, thank you for hanging with me during my long hiatus. It feels good to be blogging again and not packing, unpacking, organizing, sorting, etc. It was a huge move, definitely the most challenging we have ever done. We are happy to be back in the U.S, but even happier to be settled again. And we're not moving for a very long time...I hope.

Now, for the acorns. My mom is my source for these scrumptious little acorns. I love how easy they are to make, not to mention really good and the perfect size for little fingers. I made one change to these and that was that I used Nutella instead of canned frosting. I can't stand canned frosting and I especially don't like it for my kids (it has trans fat in it). Yuck! I was going to just make my own chocolate frosting and then I remembered that I had Nutella in my pantry. Of course, Nutella is a staple in our house and is almost better than frosting anyway! Also, much faster and less clean up since I didn't have to actually make any frosting. Here's what you need:

Nutella Acorns
Box of mini Nilla wafers
Bag of Hershey kisses
Bag of pretzels broken into little pieces (perfect job for the little ones)
Nutella

Spread a small amount of Nutella onto the backside of the Nilla wafer. Then, place a Hershey kiss on top. Next, place a dot of Nutella on the other side of the wafer and stick a broken piece of pretzel on top of it. There is your acorn! Cute, right?

Thursday, June 30, 2011

Basic Cloth Diapering

The cutest bum is back...and it's quite possible that it's even cuter than before! Being that I know so many women who are pregnant right now, I feel the need to spread the word on cloth diapering on how fun, easy, and economical it is. Last time I did a post on cloth diapering, I focused on the bum genius all in ones, which are fantastic! I absolutely love them. However, this time I decided to focus on prefolds with the diaper covers. It is very basic cloth diapering and probably the most economical way to cloth diaper. If you are new to cloth diapering it can be so overwhelming! It really is amazing how much the cloth diaper industry has changed since I had my first child seven years ago. The diapers are so much cuter and easier to use. Once you use them, you will never want to go back to using disposables again!

For this type of cloth diapering, all you need are the prefolds (which are the diapers) and then the covers to go over them. Nothing else is needed. Bummis make a great prefold as well as the covers. Both are very high quality and I recommend only using these. What is nice about the prefolds is that you can use the same size for quite awhile. I have only had to buy two different sizes for the entire time that each of my children have been in diapers. I have had to buy different size covers, but the actual diaper size doesn't change much.

As far as laundering the diapers, all you have to do is throw them in the wash (rinse them first if necessary) and then toss them in the dryer or line dry. If you are exclusively breastfeeding, you don't even need to rinse first, just throw them in the wash. For the covers, you can wash these with the diapers, but hang dry instead of using the dryer. They will dry very quickly (within a few hours). You can also use the covers a few times, before actually having to wash them. You never want to add any type of fabric softener or dryer sheet.

I love using the prefolds just as much as I love using the all in ones. There is an added step in that you have to fold the diaper first and actually place it in the cover, but it really is so simple. You will honestly love diapering your baby. It is just so fun to put the cute little covers on their bum and my daughter loves to look at all the different prints. If you are pregnant or even have a little one, please consider cloth diapering. You will be so glad you did. If you have any questions about cloth diapering, just let me know and I will do my best to answer. It can be very overwhelming if you are new to cloth diapering, because they keep coming out with new styles of diapers, and it is hard to know what to buy. You can never go wrong with the prefolds and covers as they have been around for the longest and are the most basic way to cloth diaper your baby.

If this doesn't persuade you to try cloth diapering, I don't know what will. Seriously, how cute is her bum?!?


Tuesday, May 10, 2011

Marshmallow Birthday Cupcakes

Who doesn't love marshmallows...especially when they are on top of a cupcake? These are fun cupcakes to make and eat, and perfect for a birthday! All you need is your favorite cupcake, frosted with your favorite icing, marshmallows and colored sugar. For each cupcake, cut 1 marshmallow with dampened kitchen scissors in slices; sprinkle with colored sugar. Arrange on cupcake in flower shape. Place a candle in center of each flower or pipe a large dot of frosting in the center.

This cupcake was very easy to make and I love that you can customize it to your liking. I tinted my frosting to a buttercup yellow color and then piped a large dot onto the center of each flower. Next time, I want to make these with pink marshmallows instead of white. I think the pink would look really pretty against the white frosting. The possibilities are endless!

Sunday, April 24, 2011

Ice Cube Lemon Pops

I think most everyone has had frozen ice cube popsicles....but, have you had them with a lollipop in the center? Didn't think so! This is a new twist on an old favorite and it's sure to make the little ones in your life very happy! All you need is an ice cube tray, lemonade and lollipops. That's it!

Start with your favorite lollipops (I used Dum Dums).


Then add your favorite lemonade.


Put them in the freezer and wait at least 4 hours.


Pop them out and enjoy!

**Do not let your husband attempt to "pop" them out. If he is anything like mine, he will destroy the ice cube tray while attempting to "pop" the popsicle out. :)

Friday, April 22, 2011

Earth Day Giveaway

Every Earth Day, I find myself making new Earth Day Resolutions...ways in which I can personally help take better care of our earth. Just like New Year's Resolutions, some years are better than others. One particular resolution that I have been failing at, but really want to succeed at, is ridding my life of those awful plastic bags...you know, the white ones that most stores give you when you make a purchase. I loath those! They are tacky, noisy, and just plain wasteful! Here in Germany, you rarely see those plastic bags. They just don't use them like we do in America. I'm sure it is because they are so wasteful. People just bring their own reusable bag and use it for most every purchase.

Awhile back, I purchased some really cute reusable bags to start using instead of always relying on the stores to give me a plastic bag. However, I have yet to use them. So.....today is the day that I am going to start using these bags. I pulled them out, cut off the tags and put them in my purse and car. I am determined to stop using the plastic bags once and for all!

Being that today is Earth Day, I am going to give one of these super cute reusable bags to one lucky reader. So, you also can start ridding your life of plastic bags, if you haven't already done so. You have two chances in which you can win. First, leave me a nice comment between now and April 24th. Second, become a public follower of my blog (It's okay to be a follower...it makes bloggers happy). The winner will be picked at random and will be announced on Monday, April 25th. :)

We do not inherit the earth from our ancestors, we borrow it from our children. ~Native American Proverb
Giveaway Winner: Congratulations Domestic Diva...you are the winner of the Earth Day Giveaway! Please e-mail me your shipping info, so I can get this cute bag off to you (niksblogs@yahoo.com). Thanks to everyone who participated! :)

Wednesday, April 20, 2011

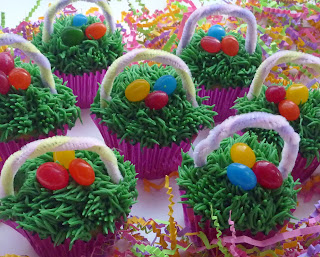
Easter Basket Cupcakes

This particular cupcake seems to be very popular this time of year. I just saw that Tori Spelling made these exact cupcakes for her kids the other day. I actually owe this cupcake idea to my sister-in-law, not Tori Spelling. Although, next year I am adding little bows to the handles like she did...it completes the look. These are easy, fun, and very cute cupcakes!! Your family will love you for making them!

Easter Basket Cupcakes
18-24 cupcakes
Buttercream Frosting
Food coloring (I used McCormick)
Pipe Cleaners
Jellybeans

Using a spatula, spread each cupcake with a layer of frosting. Your frosting does not need to be colored. For the Easter grass, combine coconut with a few drops of green food coloring (in a ziploc bag) and gently mix/shake until all of the coconut is coated. Then sprinkle coconut on top of frosted cupcake. Cut your pipe cleaner to desired length and gently press each end into cupcake, forming an arch for the handle of your basket. Last, place jellybeans in the center of the cupcake.

In my house, we are divided when it comes to coconut. My husband and I love it, my kids do not. Therefore, with this cupcake we had to compromise. Half of the cupcakes were topped with coconut and the other half were topped with buttercream only. To create the look of grass for the buttercream only cupcakes, I used Wilton tip 233 (This is the same tip I used for the Soldier Cupcakes). Everyone was happy. :)