Sunday, June 3, 2012

Homemade Lip Gloss

How cool is that? The best part...It is actually really good lip gloss and super fun to make! My daughter had Market Day at her school, so we decided this would be the perfect thing for her to make and sell. We made four different kinds of lip gloss (cherry, strawberry, pink lemonade and chocolate). We made a total of 6o little jars of lip gloss. We had a regular lip gloss factory going on in our house. It honestly was so much fun to make. It got a little messy because we had a lot of little hands helping, but it was so worth the mess! After the first few batches, we had it figured out and will definitely be making more. Here is what you need and how to make your own lip gloss:

Lip Gloss
Vaseline
Packet of Kool-Aid (any flavor)
Small containers or jars for the lip gloss
1. Put about 1 cup Vaseline in microwave safe bowl (Just eyeball it).
2. Heat the Vaseline in the microwave in 30 second increments, stirring between each heating. It will be liquid when it is fully melted. It took us about 5 minutes.
3. Take out of microwave and continue to stir while allowing it to cool down a little bit. Once it cools down slightly, add a packet of kool-aid and stir until completely dissolved.
4. Pour mixture into a Ziploc bag and snip off one of the ends. Carefully pipe it into lip gloss container or jar. If the mixture starts to solidify, you can microwave it for 30 seconds.
5. Allow it to cool and solidify before using.
*If you want to make chocolate lip gloss, add a small amount of unsweetened cocoa with a pinch of sugar instead of the kool-aid.

I bought the little plastic jars at Sally Beauty Supply. They came in a pack of 10 and were the perfect size.  Once you start making the lip gloss, it gets easier and easier and you will figure out what works for you. We made a total of 4 batches of lip gloss. We did end up with quite a bit extra. Here is the source for this awesome recipe. She also provides additional tips for making the lip gloss. Have fun!

Friday, March 9, 2012

Lemon-Orange Chiffon Cupcakes

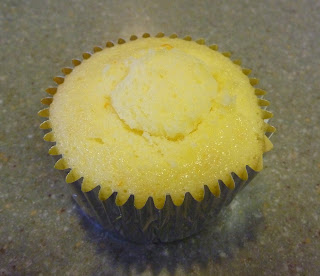
Mmmmm...these were so good and so pretty! I got this recipe out of the March issue of Southern Living (Yes, I live in the south now!). The recipe was actually for a three layer lemon-orange chiffon cake. I decided to make cupcakes instead and this time I filled them. If you haven't ever filled a cupcake, now is the time to try it. You can fill them with most anything and it's very easy to do. In this case, I filled them with the lemon-orange buttercream frosting and it was pure sweetness!!

These cupcakes were a little time consuming to make, but so worth it. They are very light and have incredible citrus flavor. You will need a lot of oranges and a few lemons, so make sure you buy plenty. These are perfect for spring, Easter, Mother's Day or just because.


Lemon-Orange Chiffon Cupcakes
2 1/2 cups sifted cake flour
1 1/3 cups sugar
1 Tbsp baking powder
1 tsp salt
1/2 cup vegetable oil
5 large eggs, separated
3/4 cup fresh orange juice
3 Tbsp orange zest
1/2 tsp cream of tartar

1. Preheat oven to 350 degrees. Combine first 4 ingredients in bowl of a heavy-duty electric stand mixer. Make a well in center of flour mixture; add oil, egg yolks, and orange juice. Beat at medium-high speed 3 to 4 minutes or until smooth. Stir in zest.
2. Beat egg whites and cream of tartar at medium-high speed until stiff peaks form. Gently fold into flour mixture. Spoon batter into muffin pan lined with paper or foil liners.
3. Bake at 350 degrees for 15-18 minutes or until a wooden pick inserted in center comes out clean. Cool in pan on wire rack for 10 minutes; remove from pan to wire rack, and cool completely (about 10 minutes).
*This recipe made exactly 24 cupcakes and there was plenty of frosting to fill them and frost them.

Lemon-Orange Buttercream Frosting
Beat 1 cup softened butter, 3 Tbsp. orange zest, and 1 Tbsp. lemon zest at medium speed with an electric mixer 1 to 2 minutes or until creamy; gradually add 1 (32 oz) package powdered sugar alternately with 3 Tbsp. fresh lemon juice and 5 Tbsp. fresh orange juice, beating at low speed until blended after each addition. Add up to 1 Tbsp. additional fresh orange juice, 1 tsp. at a time, until desired consistency is reached. Garnish cupcakes with edible flowers or kumquat slices.

Filling the Cupcakes
1. Using a small paring knife, carefully cut a small circle in the center of the cupcake. Cut almost 3/4 of the way through the cupcake. Do not cut all the way through. Gently remove the circle and cut about 1/4" off the bottom of it. Discard the bottom piece you just cut off and save the remaining part of your circle. You will need this part again.


2. To actually fill the cupcake, I find it easiest to pipe the frosting directly into the cupcake. It's simple and very neat looking. I use tip 12 to do this. Only add enough frosting to fill the cupcake. You do not want it overflowing.


3. Once you are finished filling the cupcake, gently put the circle part that you cut out back on. It will fit just above the rest of the cupcake, depending on how much of the bottom you cut off.

4. Using your favorite tip, pipe the frosting on the top of the cupcake. Garnish as desired.

Monday, February 13, 2012

Candy Heart Math

If your kids are anything like mine, they end up with way too many candy hearts after Valentine's Day. Here are a few fun activities to make good use of all those candy hearts.

Estimating Jar
Fill a small jar with the candy hearts. Have each person write down their guess on a piece of paper. Once everyone has taken their turn, empty the jar and count the hearts. You can count by 1's, 2's, 5's...however you like. This is a great way to practice counting and estimating.


Candy Heart Graph
Using a white piece of paper (or graph paper) make a quick graph for each child. Number the left side 1-6 and then write the different colors on the bottom of the graph. Show each child how to graph his/her candy hearts by placing them in the correct column. Once they have graphed all of their hearts, they can go back and color in the graph and eat the candy hearts. :)


Candy Heart Math Facts
This activity is my favorite! It's a great way for kids to practice their math facts. You take small brown paper bags and label each bag on the outside with a letter (A, B, C, D). Inside each bag, put different amounts of two different colored hearts. For example, in bag A, I am going to put in 2 pink hearts and 1 orange heart. For bag B, I am going to put in 3 yellow hearts and 1 white heart. After you have filled all of the bags, fold them closed and give each child a piece of paper and pencil and have them open each bag and form a math problem based on the hearts that are inside. For example, in bag A, a math problem could be 2+1=3. You could also add 3 different colored hearts to make it more challenging. This activity can easily be modified to meet any child's instructional level.

Oatmeal Cupcakes

I found this recipe for oatmeal cake in my mom's old recipe box and decided to try it as a cupcake. Oatmeal has never tasted so good! The topping that the recipe calls for is a broiled coconut topping. It is fantastic with the oatmeal cupcake! Just for variation, I also made this cream cheese frosting. Oatmeal cupcake with cream cheese frosting...how can you go wrong?!

I ended up making two batches of these cupcakes since I decided to also use the cream cheese frosting. Each batch makes exactly 24 cupcakes. I couldn't keep all those cupcakes for us and they are just too yummy to not share, so my kids gave some to their teachers for Valentine's Day. We put them in these adorable little cupcake boxes.

Oatmeal Cupcakes

1 1/2 cups boiling water
1 cup oatmeal
*In a medium sized bowl, pour water over oatmeal and let stand for 10 minutes.

1 cup brown sugar
1 cup white sugar
1/2 cup butter
2 eggs, unbeatened.
*In a large bowl, mix these ingredients together. Stir in oatmeal and mix with a spoon.

1 teaspoon baking soda
1/2 teaspoon salt
1 teaspoon cinnamon
1 1/2 cups flour
*In a small bowl mix these dry ingredients, then slowly add to the oatmeal mixture.

Poor into muffin tins and bake at 350 degrees for 20-22 minutes or until done.
While cupcakes are baking, prepare the broiled topping.

Broiled Topping
1/2 cup butter
1 cup brown sugar
1/4 cup evaporated milk (Carnation)
1 cup coconut
1 cup chopped nuts
1 teaspoon vanilla

Melt butter. Add other ingredients and mix well. Spread on cupcakes as soon as removed from oven. Place under broiler until coconut is browned (brown slowly). Don't let it harden.

I hope you enjoy these cupcakes as much as we did. If you're looking for a slightly healthier version, just omit the topping/frosting altogether. They will still be just as yummy.

Thursday, February 2, 2012

Groundhog Cupcakes

This is one cupcake I have never thought to make, until now. I got this idea from my son's kindergarten teacher. Apparently, the class thinks they are going to eat an actual groundhog tomorrow, but really it is going to be a groundhog cupcake. My son is pretty freaked out about this. Wouldn't you be if you were 5 years old?!? I decided to put my own spin on her groundhog cupcake and this is what I came up with. I just used what I had in my pantry and made due.

For the frosting, I used the same chocolate frosting I used in this recipe. It makes the perfect amount to frost 24 cupcakes. I used tip 233 to make the groundhog fur. For the eyes, I used small candy pieces and for the nose I used an m&m. For the mouth, I cut one mini marshmallow in half and for the ears I used dry cereal. That's it...pretty simple! Happy Groundhog Day!


Wednesday, January 4, 2012

Spritzer

Here is the recipe I was telling you about. The one that calls for cranberry juice. It is so good! Unfortunately, this recipe doesn't have exact measurements. It came from my husband, who was served this drink while flying generals and other important political leaders around Europe (rough job, I know!). Apparently, it is their drink of choice, and after having it I can see why.

Spritzer
Cranberry Juice
Sprite
Crystal Light on the go drink packet (I prefer the lemonde flavor)
Water
Crushed Ice
*I used a 16 oz glass to make this drink and it made one serving.

Dissolve 1/2 packet of crystal light into 1 oz. hot water and mix. Add crushed ice so glass is full. Fill the remaining glass with equal amounts of cranberry juice and sprite. Mix and enjoy!

My kids love this drink! One likes it with only the cranberry juice (no Sprite) and the other one prefers more Sprite, less cranberry. After making it a few times, you can decide exactly how you like it. You can also make it with different Crystal Light flavors. The lemonade just happens to be my favorite.

Tuesday, November 29, 2011

Brownie Cupcakes

I just made these cupcakes for Thanksgiving. I know they are not your typical Thanksgiving dessert, but I wanted to make something that I knew my kids would love (Don't worry, I made pumpkin pie too). They always pretend they like pumpkin pie, but I know better. They put on a pretty decent act, which I appreciate, but this year I wanted them to have something they would truly enjoy. So, I decided to make them cupcake brownies. These are quite possibly the easiest cupcakes to make and very fun because you can add your own toppings and be as creative as you would like. I also like that the recipe only makes 12...the perfect amount for us!

Brownie Cupcakes
1 package brownie mix
1/2 cup canola oil
1/4 cup cranberry juice
2 large eggs
Toppings: chocolate chips, sprinkles, marshmallows, candycanes, pretzels, etc.
Powdered sugar (optional)
**I used mini chocolate chips, chocolate covered pretzels (coursely chopped), m&m's, and sprinkles.

1. Stir together first 4 ingredients until smooth. Spoon batter into muffin pan lined with paper/foil liners. Sprinkle with desired toppings. Batter will evenly fill 12 muffin cups.

2. Bake at 350 degrees for 20-25 minutes or until a wooden pick inserted in center of cupcakes comes out clean. Remove from pan, and cool on a wire rack. Sprinkle with powdered sugar, if desired.

Wondering what to do with all that leftover cranberry juice? Stay tuned for a very festive beverage recipe that is a favorite amongst our nation's top military leaders....don't ask me how I know this. Until then, go make the brownie cupcakes and eagerly await for this top secret recipe! :)

Friday, October 21, 2011

Nutella Acorns

For those of you who are still readers of this blog, thank you for hanging with me during my long hiatus. It feels good to be blogging again and not packing, unpacking, organizing, sorting, etc. It was a huge move, definitely the most challenging we have ever done. We are happy to be back in the U.S, but even happier to be settled again. And we're not moving for a very long time...I hope.

Now, for the acorns. My mom is my source for these scrumptious little acorns. I love how easy they are to make, not to mention really good and the perfect size for little fingers. I made one change to these and that was that I used Nutella instead of canned frosting. I can't stand canned frosting and I especially don't like it for my kids (it has trans fat in it). Yuck! I was going to just make my own chocolate frosting and then I remembered that I had Nutella in my pantry. Of course, Nutella is a staple in our house and is almost better than frosting anyway! Also, much faster and less clean up since I didn't have to actually make any frosting. Here's what you need:

Nutella Acorns
Box of mini Nilla wafers
Bag of Hershey kisses
Bag of pretzels broken into little pieces (perfect job for the little ones)
Nutella

Spread a small amount of Nutella onto the backside of the Nilla wafer. Then, place a Hershey kiss on top. Next, place a dot of Nutella on the other side of the wafer and stick a broken piece of pretzel on top of it. There is your acorn! Cute, right?

Thursday, June 30, 2011

Basic Cloth Diapering

The cutest bum is back...and it's quite possible that it's even cuter than before! Being that I know so many women who are pregnant right now, I feel the need to spread the word on cloth diapering on how fun, easy, and economical it is. Last time I did a post on cloth diapering, I focused on the bum genius all in ones, which are fantastic! I absolutely love them. However, this time I decided to focus on prefolds with the diaper covers. It is very basic cloth diapering and probably the most economical way to cloth diaper. If you are new to cloth diapering it can be so overwhelming! It really is amazing how much the cloth diaper industry has changed since I had my first child seven years ago. The diapers are so much cuter and easier to use. Once you use them, you will never want to go back to using disposables again!

For this type of cloth diapering, all you need are the prefolds (which are the diapers) and then the covers to go over them. Nothing else is needed. Bummis make a great prefold as well as the covers. Both are very high quality and I recommend only using these. What is nice about the prefolds is that you can use the same size for quite awhile. I have only had to buy two different sizes for the entire time that each of my children have been in diapers. I have had to buy different size covers, but the actual diaper size doesn't change much.

As far as laundering the diapers, all you have to do is throw them in the wash (rinse them first if necessary) and then toss them in the dryer or line dry. If you are exclusively breastfeeding, you don't even need to rinse first, just throw them in the wash. For the covers, you can wash these with the diapers, but hang dry instead of using the dryer. They will dry very quickly (within a few hours). You can also use the covers a few times, before actually having to wash them. You never want to add any type of fabric softener or dryer sheet.

I love using the prefolds just as much as I love using the all in ones. There is an added step in that you have to fold the diaper first and actually place it in the cover, but it really is so simple. You will honestly love diapering your baby. It is just so fun to put the cute little covers on their bum and my daughter loves to look at all the different prints. If you are pregnant or even have a little one, please consider cloth diapering. You will be so glad you did. If you have any questions about cloth diapering, just let me know and I will do my best to answer. It can be very overwhelming if you are new to cloth diapering, because they keep coming out with new styles of diapers, and it is hard to know what to buy. You can never go wrong with the prefolds and covers as they have been around for the longest and are the most basic way to cloth diaper your baby.

If this doesn't persuade you to try cloth diapering, I don't know what will. Seriously, how cute is her bum?!?


Tuesday, May 10, 2011

Marshmallow Birthday Cupcakes

Who doesn't love marshmallows...especially when they are on top of a cupcake? These are fun cupcakes to make and eat, and perfect for a birthday! All you need is your favorite cupcake, frosted with your favorite icing, marshmallows and colored sugar. For each cupcake, cut 1 marshmallow with dampened kitchen scissors in slices; sprinkle with colored sugar. Arrange on cupcake in flower shape. Place a candle in center of each flower or pipe a large dot of frosting in the center.

This cupcake was very easy to make and I love that you can customize it to your liking. I tinted my frosting to a buttercup yellow color and then piped a large dot onto the center of each flower. Next time, I want to make these with pink marshmallows instead of white. I think the pink would look really pretty against the white frosting. The possibilities are endless!

Sunday, April 24, 2011

Ice Cube Lemon Pops

I think most everyone has had frozen ice cube popsicles....but, have you had them with a lollipop in the center? Didn't think so! This is a new twist on an old favorite and it's sure to make the little ones in your life very happy! All you need is an ice cube tray, lemonade and lollipops. That's it!

Start with your favorite lollipops (I used Dum Dums).


Then add your favorite lemonade.


Put them in the freezer and wait at least 4 hours.


Pop them out and enjoy!

**Do not let your husband attempt to "pop" them out. If he is anything like mine, he will destroy the ice cube tray while attempting to "pop" the popsicle out. :)

Friday, April 22, 2011

Earth Day Giveaway

Every Earth Day, I find myself making new Earth Day Resolutions...ways in which I can personally help take better care of our earth. Just like New Year's Resolutions, some years are better than others. One particular resolution that I have been failing at, but really want to succeed at, is ridding my life of those awful plastic bags...you know, the white ones that most stores give you when you make a purchase. I loath those! They are tacky, noisy, and just plain wasteful! Here in Germany, you rarely see those plastic bags. They just don't use them like we do in America. I'm sure it is because they are so wasteful. People just bring their own reusable bag and use it for most every purchase.

Awhile back, I purchased some really cute reusable bags to start using instead of always relying on the stores to give me a plastic bag. However, I have yet to use them. So.....today is the day that I am going to start using these bags. I pulled them out, cut off the tags and put them in my purse and car. I am determined to stop using the plastic bags once and for all!

Being that today is Earth Day, I am going to give one of these super cute reusable bags to one lucky reader. So, you also can start ridding your life of plastic bags, if you haven't already done so. You have two chances in which you can win. First, leave me a nice comment between now and April 24th. Second, become a public follower of my blog (It's okay to be a follower...it makes bloggers happy). The winner will be picked at random and will be announced on Monday, April 25th. :)

We do not inherit the earth from our ancestors, we borrow it from our children. ~Native American Proverb

Giveaway Winner: Congratulations Domestic Diva...you are the winner of the Earth Day Giveaway! Please e-mail me your shipping info, so I can get this cute bag off to you (niksblogs@yahoo.com). Thanks to everyone who participated! :)

Wednesday, April 20, 2011

Easter Basket Cupcakes

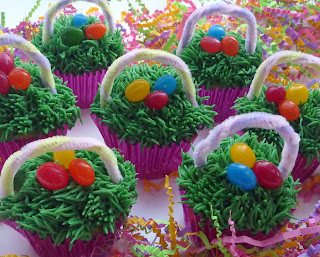
This particular cupcake seems to be very popular this time of year. I just saw that Tori Spelling made these exact cupcakes for her kids the other day. I actually owe this cupcake idea to my sister-in-law, not Tori Spelling. Although, next year I am adding little bows to the handles like she did...it completes the look. These are easy, fun, and very cute cupcakes!! Your family will love you for making them!

Easter Basket Cupcakes
18-24 cupcakes
Buttercream Frosting
Food coloring (I used McCormick)
Pipe Cleaners
Jellybeans

Using a spatula, spread each cupcake with a layer of frosting. Your frosting does not need to be colored. For the Easter grass, combine coconut with a few drops of green food coloring (in a ziploc bag) and gently mix/shake until all of the coconut is coated. Then sprinkle coconut on top of frosted cupcake. Cut your pipe cleaner to desired length and gently press each end into cupcake, forming an arch for the handle of your basket. Last, place jellybeans in the center of the cupcake.

In my house, we are divided when it comes to coconut. My husband and I love it, my kids do not. Therefore, with this cupcake we had to compromise. Half of the cupcakes were topped with coconut and the other half were topped with buttercream only. To create the look of grass for the buttercream only cupcakes, I used Wilton tip 233 (This is the same tip I used for the Soldier Cupcakes). Everyone was happy. :)


Thursday, March 31, 2011

Pinkalicious Cupcakes

We are big Pinkalicious fans in my house! We have all the books, including the newest one, Silverlicious. It is such a cute book, with a great storyline! When I found this recipe for the Pinkalicious cupcakes I knew I had to make them! Check out http://www.thinkpinkalicious.com/ for more fun pinkalicious activities (as well as the actual recipe). The website is just as cute as the books! :)

Getting to the cupcakes...These were very easy and fun to make. Make sure to recruit little helpers for this one. They will love adding the 20 drops (or more) of food coloring as well as the decorating part of the cupcake. The pink definitely makes everything more fun as do the sprinkles and whatever else you decide to add. Pink not your color? Substitute for a different color! I think next time we're going for blue cupcakes. The possibilities are endless...have fun!

Pinkalicious Cupcakes
1/2 cup unsalted butter, softened
3/4 cup sugar
2 large eggs
2 teaspoons vanilla
1 1/2 cups all-purpose flour
1/2 teaspoon baking powder
1/2 teaspoon salt
2/3 cup milk
pink food coloring (I used McCormick)

1. Preheat oven to 350 degrees and line a muffin tin with paper liners.
2. In a large size bowl, use an electric mixer to beat the butter and sugar together until it's light and fluffy. Add the eggs, one at a time, beating the mixture well after each egg. Then add the vanilla.
3. In a medium size bowl, combine the flour, baking powder, and salt.
4. Gradually add the flour mixture and milk using a wooden spoon or rubber spatula to the wet mixture and combine thoroughly.
5. Add 20 drops of food coloring to the batter and stir.
6. Evenly fill the liners with batter and bake for 18-24 minutes, or until a toothpick inserted in the center comes out clean. Remove the cupcakes from the muffin tin and cool completely on a wire rack.

Buttercream Frosting
3 1/2 cups confectioners sugar
1/2 cup unsalted butter, softened
2 teaspoons vanilla extract
1/4 cup milk (or water)
pink food coloring

1. Combine the confectioners sugar, butter, vanilla and milk in a medium size bowl and beat with an electric mixer until smooth and creamy. Mix in a few drops of pink food coloring into the frosting to create the perfect shade of pink.
2. After the cupcakes have completely cooled, decorate the cupcakes with frosting. And, of course, sprinkles or candy (I used pink cake sparkles and tip 12 to pipe the frosting).
**I prefer to use water when making the frosting, that way I don't have to worry about refrigerating the cupcakes. Also, I did not use 1/4 cup water...I used my teaspoons and measured very small amounts until I reached my desired consistency.

A few things about this recipe...First, it only makes 12 cupcakes and enough frosting to frost those 12 cupcakes. Second, the cupcake itself is very good, but not very sweet. However, the frosting makes up for that! The cupcakes are moist, but not nearly as light as a cupcake made from a box cake mix. If I was making these for a large group of kids, I would probably use a box mix and just add the food coloring. However, for a smaller group of kids this recipe is perfect...or if you're just in the mood to make cupcakes.

Monday, February 28, 2011

Soldier Cupcakes

For my son's birthday this year, it was all about soldiers, military, GI Joe. In keeping with that theme, we decided on soldier cupcakes. These were the easiest, most fun cupcakes I've decorated to date. I made my usual buttercream frosting and colored it using two different greens from Wilton. I started with Leaf Green, but didn't like the green it was turning into, so I added Juniper Green to it and luckily it turned into the green I was hoping for. Then I used Wilton tip 233 to make the blades of grass. This was my first time working with this tip and I had so much fun using it. I love that it doesn't have to have a perfect look, so it doesn't really matter how experienced of a decorator you are. The tip itself creates a really cool look and is easy to use. It took a little bit of time to pipe the grass onto each cupcake, but nothing too involved. I bought the little plastic soliders awhile ago, specifically for my son's cake/cupcakes, and they worked perfect. I was really happy with how these turned out and so was the birthday boy!


Tuesday, February 22, 2011

Heart Healthy Cupcakes

These are not my standard cupcakes that I usually make, topped with a ridiculous amount of frosting, but they are equally as good and significantly healthier. I found this recipe in a Family Fun Magazine quite a few years ago. I remember liking them, but had not made them in so long. In an effort to be healthier, I decided to make them the other day, only this time I made some changes (healthier changes) and I couldn't be happier with the result. So happy in fact, the cupcakes were gone within 2 days and not only did I love them, but my kiddos did as well. Here is my adapted version of the recipe:

Heart Healthy Cupcakes
1 cup (8 ounce can) crushed pineapple in its own juice
1 1/2 cups whole wheat flour
1 1/2 cups flour
1 1/2 cups sugar
1 teaspoon baking soda
1 teaspoon baking powder
1 teaspoon salt
2 teaspoons cinnamon
2 large eggs
1 egg white
1/2 cup vegetable oil
1/2 cup honey
2 teaspoons vanilla extract
2 cups coarsely shredded carrots
1/2 cup unsweetened applesauce

Heat the oven to 350 degrees. Drain the pineapple and reserve the juice. In a large bowl, whisk together the flour, sugar, baking soda, baking powder, salt and cinnamon. Make a well in the center of the mixture and drop in the eggs, egg white, oil, honey, vanilla extract, and reserved pineapple juice. Beat at medium speed until blended, about 1 1/2 minutes. With a spoon, stir in the crushed pineapple, shredded carrots, and applesauce. Then spoon the batter into paper baking cups set in muffin tins. Bake until a toothpick stuck in the center of a cupcake comes out clean, about 22 minutes. Remove pan from oven and cool on a wire rack for 2 minutes. Serve warm or cool...either way, they are fantastic!

**I just recently started substituting honey for sugar whenever possible. This is the first time I tried it with this recipe and I really liked using the honey. I couldn't tell a difference. Here is a great link if you're interested in substituting honey into more of your baking. It's a healthier alternative to sugar.

Wednesday, January 26, 2011

Mac 'n Cheese Cupcakes

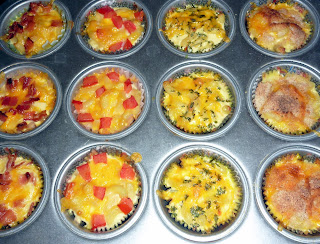
Cupcakes for dinner, why not? Okay, so this isn't your typical cucpake...it's a mac 'n cheese cupcake and it's perfect for dinner, especially if you have kiddos. I have to be honest, though, it has taken me a few times to perfect this recipe to my kids' liking. I love this recipe for many reasons: it's super easy to make, most/all of the ingredients you probably have on hand, it is possible to make this entire recipe while holding a 25 pound sack of potatoes (baby girl), it's much tastier and healthier than the box mac 'n cheese, and you can customize it to everyone's liking.

The first time I made these I didn't add nearly enough salt and pepper and they were very bland. The next few times, they were much better, but still seemed to be missing something. Tonight, I feel like I nailed it...finally! I decided to top the cupcakes with something different for each of my children. For my baby girl, I topped hers with tomatoes. For my little man, I topped his with bacon (He LOVES bacon!) and for my older girl, I topped hers with parsley...because it's fancy and she likes fancy. And for mine, I decided to go with breadcrumbs. Everyone loved having their very own cupcake that was created just for them. It definitely added a little something extra by adding the toppings. I tried the tomato, bacon and breadcumb cupcakes and I couldn't decide which was my favorite. They were all so good! I'm already thinking about what I can top them with next...any fun, crazy ideas?

Mac 'n Cheese Cupcakes (adapted from Framed Cooks)
8 oz. elbow macaroni
2 cups shredded cheddar cheese, plus a little more for garnish
2 eggs
1 cup milk
Salt and Pepper
Diced tomatoes, bacon, breadcrumbs, parsley for toppings (optional)

1. Preheat oven to 400 degrees. Line a 12 cup muffin tin with paper or foil liners.
2. Cook the macaroni until done. Drain and immediately return to pot.
3. Add cheese and stir briefly, until almost melting.
4. Beat eggs into milk (add salt and pepper), and then pour mixture into macaroni. Mix well.
5. Ladle macaroni mixture into muffin tins. Sprinkle with remaining cheese and add toppings, if desired. Bake for 20 minutes. Cool slightly before serving.

Wednesday, January 12, 2011

Happy New Year!

I was hoping to have some fab New Year's cupcakes on here, but unfortunately, I haven't had time to make any. I do have some new recipes I am really anxious to try and share. Until then, here are a few posts I think you might like.

I have been wanting to make these for soooooo long! Sweet and salty....it just doesn't get any better! Wait, a sweet and salty cupcake....maybe?

Do you need a good laugh? Check out this post my friend Jamie did on her family's worst pics. It is seriously funny and guaranteed to make you laugh!

How cute is this checkerboard and this headband? I've been wanting to make both of these, but never have quite enough time (or all of the supplies...oh, how I miss Michaels!).

Looking for a great mac 'n cheese recipe? Look no further!

Here's wishing everyone a happy and healthy New Year! No matter how crazy and hectic the year may get, try to remember to stop and smell the roses...or in this case, poinsettias!

Tuesday, December 21, 2010

Mini Candy Jars

Ever since I was a little girl, I have always enjoyed making little gifts for people. Nothing fancy or expensive, just simple and sweet. Mostly, I made them for my great grandmas and great aunts. My mom was always helpful and supportive when it came to me wanting to make something. Now as an adult, I have found that I still enjoy doing this....only now, with my children. Last year, we made these hot cocoa cones. They were a lot of fun and super easy to make. This year, we decided to make these little candy jars with recycled baby food jars (*Never throw out baby food jars. They can be used for so many things!). I think they turned out pretty cute. :)

You will need:


baby food jars with lids (any size)
spray paint (your color choice)
kids paint (Crayola makes a great paints)
paintbrush (fine tip works best)
ribbon/rafia
candy

First, spray paint your lids. Depending on the color, you may need another coat. While the lids are drying, get your kiddos ready to paint. We started with the snowman and used their fingertips for the body. While that was drying, we moved on to something else. My daughter chose a wreath and Christmas tree and my son chose hot cocoa with marshmallows (I like his thinking!). The only thing I really helped them with were the snowmen. When all was finished, we added little white dots for snow. When the jars were finished drying, we added the candy, put the lid on and added a little bow...voila! A cute little Christmas jar filled with your favorite holiday candy.

My daughter really enjoyed this activity. It definitely involved patience. My son started out great, but towards the end was ready to be finished. I always love seeing their paintings and drawings. There is just something about kid artwork that makes my heart happy. It is just so sweet and full of life. I love it!

Monday, December 13, 2010

Red Velvet Cupcakes

Up until the other day, I had never made red velvet cupcakes. I tried one once and wasn't too crazy about it. However, when I came across this recipe for white chocolate peppermint cream cheese frosting, this was the cupcake that accompanied it...so, I decided that it was time to give red velvet cupcakes another chance. And, I'm so glad I did! They were delicious and oh, so pretty! Perfect for the holidays!! On top of that, they were very easy to make. So, grab your baking partner (my 7 year old daughter fit the job description) and get started.

Red Velvet Cupcakes (Recipe from Anne Byrn)
1 box plain German chocolate cake mix
1 package (3.4 oz) instant vanilla pudding mix
1 cup sour cream (you can use light if you so desire)
1/2 cup water
1/2 cup vegetable oil
1 bottle (1 oz) red food coloring
3 large eggs
1 cup miniature chocolate chips

1. Preheat oven to 350 degrees. Line cupcake pan with liners.
2. Place the cake mix, pudding mix, sour cream, water, oil, food coloring, and eggs in a large mixing bowl. Blend on low for 30 seconds and then increase to medium speed and mix for an additional 4-5 minutes, scraping down sides of bowl as necessary. Fold in chocolate chips. Your batter should be a beautiful red color. Spoon 1/3 cup batter into each cup, filling it 3/4 of the way full. You will get between 22-24 cupcakes. Place the pan in oven and bake for 18-20 minutes or until a toothpick inserted in the center comes out clean.
3. Remove pan from oven and allow to cool on wire rack for 5 minutes. Carefully remove cupcakes from pan and allow to cool completely before frosting.

White Chocolate Peppermint Cream Cheese Frosting
6 ounces white chocolate, coarsely chopped
4 ounces cream cheese, softened
4 tablespoons (1/2 stick) butter, softened
1 teaspoon peppermint extract
2 to 2 1/2 cups confectioners sugar, sifted
Candy canes (optional)

1. Place the white chocolate in a small glass bowl in the microwave oven on high for one minute. Remove the bowl from the oven and stir with a wooden spoon or rubber spatula until smooth. Set the chocolate aside to cool.
2. Place the cream cheese and butter in a large mixing bowl. Beat with an electric mixer on low speed until well combined, 30 seconds. Add the melted white chocolate and blend on low speed until just combined, about 30 seconds. Add the peppermint extract and 2 cups of the confectioners sugar and blend on low speed until the sugar is incorporated, 30 seconds more. Increase mixer speed to medium and mix an additional minute or until frosting is fluffy (adding 1/2 cup more sugar if needed).
3. Frost cupcakes as desired. I decided to add chopped candy cane to the frosting before I frosted the cupcakes. It added a nice touch to the cupcakes and I liked the crunch effect when biting into the cupcake.
**If you are piping the frosting on the cupcakes I recommend doubling this recipe. I did not have enough frosting for all 24 of my cupcakes. You use more frosting when piping versus using a spatula. I also wish I would have had extra white chocolate to put chocolate shavings on the top. You really can do all sorts of fun combinations with this cupcakes. My daughter liked putting the candy canes right on top. I used Wilton tip 2A for piping these cupcakes.