Sunday, June 3, 2012

Homemade Lip Gloss

How cool is that? The best part...It is actually really good lip gloss and super fun to make! My daughter had Market Day at her school, so we decided this would be the perfect thing for her to make and sell. We made four different kinds of lip gloss (cherry, strawberry, pink lemonade and chocolate). We made a total of 6o little jars of lip gloss. We had a regular lip gloss factory going on in our house. It honestly was so much fun to make. It got a little messy because we had a lot of little hands helping, but it was so worth the mess! After the first few batches, we had it figured out and will definitely be making more. Here is what you need and how to make your own lip gloss:

Lip Gloss
Vaseline
Packet of Kool-Aid (any flavor)
Small containers or jars for the lip gloss
1. Put about 1 cup Vaseline in microwave safe bowl (Just eyeball it).
2. Heat the Vaseline in the microwave in 30 second increments, stirring between each heating. It will be liquid when it is fully melted. It took us about 5 minutes.
3. Take out of microwave and continue to stir while allowing it to cool down a little bit. Once it cools down slightly, add a packet of kool-aid and stir until completely dissolved.
4. Pour mixture into a Ziploc bag and snip off one of the ends. Carefully pipe it into lip gloss container or jar. If the mixture starts to solidify, you can microwave it for 30 seconds.
5. Allow it to cool and solidify before using.
*If you want to make chocolate lip gloss, add a small amount of unsweetened cocoa with a pinch of sugar instead of the kool-aid.

I bought the little plastic jars at Sally Beauty Supply. They came in a pack of 10 and were the perfect size.  Once you start making the lip gloss, it gets easier and easier and you will figure out what works for you. We made a total of 4 batches of lip gloss. We did end up with quite a bit extra. Here is the source for this awesome recipe. She also provides additional tips for making the lip gloss. Have fun!

Friday, March 9, 2012

Lemon-Orange Chiffon Cupcakes

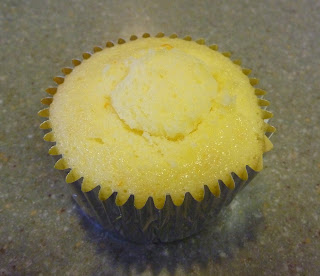
Mmmmm...these were so good and so pretty! I got this recipe out of the March issue of Southern Living (Yes, I live in the south now!). The recipe was actually for a three layer lemon-orange chiffon cake. I decided to make cupcakes instead and this time I filled them. If you haven't ever filled a cupcake, now is the time to try it. You can fill them with most anything and it's very easy to do. In this case, I filled them with the lemon-orange buttercream frosting and it was pure sweetness!!

These cupcakes were a little time consuming to make, but so worth it. They are very light and have incredible citrus flavor. You will need a lot of oranges and a few lemons, so make sure you buy plenty. These are perfect for spring, Easter, Mother's Day or just because.


Lemon-Orange Chiffon Cupcakes
2 1/2 cups sifted cake flour
1 1/3 cups sugar
1 Tbsp baking powder
1 tsp salt
1/2 cup vegetable oil
5 large eggs, separated
3/4 cup fresh orange juice
3 Tbsp orange zest
1/2 tsp cream of tartar

1. Preheat oven to 350 degrees. Combine first 4 ingredients in bowl of a heavy-duty electric stand mixer. Make a well in center of flour mixture; add oil, egg yolks, and orange juice. Beat at medium-high speed 3 to 4 minutes or until smooth. Stir in zest.
2. Beat egg whites and cream of tartar at medium-high speed until stiff peaks form. Gently fold into flour mixture. Spoon batter into muffin pan lined with paper or foil liners.
3. Bake at 350 degrees for 15-18 minutes or until a wooden pick inserted in center comes out clean. Cool in pan on wire rack for 10 minutes; remove from pan to wire rack, and cool completely (about 10 minutes).
*This recipe made exactly 24 cupcakes and there was plenty of frosting to fill them and frost them.

Lemon-Orange Buttercream Frosting
Beat 1 cup softened butter, 3 Tbsp. orange zest, and 1 Tbsp. lemon zest at medium speed with an electric mixer 1 to 2 minutes or until creamy; gradually add 1 (32 oz) package powdered sugar alternately with 3 Tbsp. fresh lemon juice and 5 Tbsp. fresh orange juice, beating at low speed until blended after each addition. Add up to 1 Tbsp. additional fresh orange juice, 1 tsp. at a time, until desired consistency is reached. Garnish cupcakes with edible flowers or kumquat slices.

Filling the Cupcakes
1. Using a small paring knife, carefully cut a small circle in the center of the cupcake. Cut almost 3/4 of the way through the cupcake. Do not cut all the way through. Gently remove the circle and cut about 1/4" off the bottom of it. Discard the bottom piece you just cut off and save the remaining part of your circle. You will need this part again.


2. To actually fill the cupcake, I find it easiest to pipe the frosting directly into the cupcake. It's simple and very neat looking. I use tip 12 to do this. Only add enough frosting to fill the cupcake. You do not want it overflowing.


3. Once you are finished filling the cupcake, gently put the circle part that you cut out back on. It will fit just above the rest of the cupcake, depending on how much of the bottom you cut off.

4. Using your favorite tip, pipe the frosting on the top of the cupcake. Garnish as desired.

Monday, February 13, 2012

Candy Heart Math

If your kids are anything like mine, they end up with way too many candy hearts after Valentine's Day. Here are a few fun activities to make good use of all those candy hearts.

Estimating Jar
Fill a small jar with the candy hearts. Have each person write down their guess on a piece of paper. Once everyone has taken their turn, empty the jar and count the hearts. You can count by 1's, 2's, 5's...however you like. This is a great way to practice counting and estimating.


Candy Heart Graph
Using a white piece of paper (or graph paper) make a quick graph for each child. Number the left side 1-6 and then write the different colors on the bottom of the graph. Show each child how to graph his/her candy hearts by placing them in the correct column. Once they have graphed all of their hearts, they can go back and color in the graph and eat the candy hearts. :)


Candy Heart Math Facts
This activity is my favorite! It's a great way for kids to practice their math facts. You take small brown paper bags and label each bag on the outside with a letter (A, B, C, D). Inside each bag, put different amounts of two different colored hearts. For example, in bag A, I am going to put in 2 pink hearts and 1 orange heart. For bag B, I am going to put in 3 yellow hearts and 1 white heart. After you have filled all of the bags, fold them closed and give each child a piece of paper and pencil and have them open each bag and form a math problem based on the hearts that are inside. For example, in bag A, a math problem could be 2+1=3. You could also add 3 different colored hearts to make it more challenging. This activity can easily be modified to meet any child's instructional level.

Oatmeal Cupcakes

I found this recipe for oatmeal cake in my mom's old recipe box and decided to try it as a cupcake. Oatmeal has never tasted so good! The topping that the recipe calls for is a broiled coconut topping. It is fantastic with the oatmeal cupcake! Just for variation, I also made this cream cheese frosting. Oatmeal cupcake with cream cheese frosting...how can you go wrong?!

I ended up making two batches of these cupcakes since I decided to also use the cream cheese frosting. Each batch makes exactly 24 cupcakes. I couldn't keep all those cupcakes for us and they are just too yummy to not share, so my kids gave some to their teachers for Valentine's Day. We put them in these adorable little cupcake boxes.

Oatmeal Cupcakes

1 1/2 cups boiling water
1 cup oatmeal
*In a medium sized bowl, pour water over oatmeal and let stand for 10 minutes.

1 cup brown sugar
1 cup white sugar
1/2 cup butter
2 eggs, unbeatened.
*In a large bowl, mix these ingredients together. Stir in oatmeal and mix with a spoon.

1 teaspoon baking soda
1/2 teaspoon salt
1 teaspoon cinnamon
1 1/2 cups flour
*In a small bowl mix these dry ingredients, then slowly add to the oatmeal mixture.

Poor into muffin tins and bake at 350 degrees for 20-22 minutes or until done.
While cupcakes are baking, prepare the broiled topping.

Broiled Topping
1/2 cup butter
1 cup brown sugar
1/4 cup evaporated milk (Carnation)
1 cup coconut
1 cup chopped nuts
1 teaspoon vanilla

Melt butter. Add other ingredients and mix well. Spread on cupcakes as soon as removed from oven. Place under broiler until coconut is browned (brown slowly). Don't let it harden.

I hope you enjoy these cupcakes as much as we did. If you're looking for a slightly healthier version, just omit the topping/frosting altogether. They will still be just as yummy.

Thursday, February 2, 2012

Groundhog Cupcakes

This is one cupcake I have never thought to make, until now. I got this idea from my son's kindergarten teacher. Apparently, the class thinks they are going to eat an actual groundhog tomorrow, but really it is going to be a groundhog cupcake. My son is pretty freaked out about this. Wouldn't you be if you were 5 years old?!? I decided to put my own spin on her groundhog cupcake and this is what I came up with. I just used what I had in my pantry and made due.

For the frosting, I used the same chocolate frosting I used in this recipe. It makes the perfect amount to frost 24 cupcakes. I used tip 233 to make the groundhog fur. For the eyes, I used small candy pieces and for the nose I used an m&m. For the mouth, I cut one mini marshmallow in half and for the ears I used dry cereal. That's it...pretty simple! Happy Groundhog Day!


Wednesday, January 4, 2012

Spritzer

Here is the recipe I was telling you about. The one that calls for cranberry juice. It is so good! Unfortunately, this recipe doesn't have exact measurements. It came from my husband, who was served this drink while flying generals and other important political leaders around Europe (rough job, I know!). Apparently, it is their drink of choice, and after having it I can see why.

Spritzer
Cranberry Juice
Sprite
Crystal Light on the go drink packet (I prefer the lemonde flavor)
Water
Crushed Ice
*I used a 16 oz glass to make this drink and it made one serving.

Dissolve 1/2 packet of crystal light into 1 oz. hot water and mix. Add crushed ice so glass is full. Fill the remaining glass with equal amounts of cranberry juice and sprite. Mix and enjoy!

My kids love this drink! One likes it with only the cranberry juice (no Sprite) and the other one prefers more Sprite, less cranberry. After making it a few times, you can decide exactly how you like it. You can also make it with different Crystal Light flavors. The lemonade just happens to be my favorite.

Tuesday, November 29, 2011

Brownie Cupcakes

I just made these cupcakes for Thanksgiving. I know they are not your typical Thanksgiving dessert, but I wanted to make something that I knew my kids would love (Don't worry, I made pumpkin pie too). They always pretend they like pumpkin pie, but I know better. They put on a pretty decent act, which I appreciate, but this year I wanted them to have something they would truly enjoy. So, I decided to make them cupcake brownies. These are quite possibly the easiest cupcakes to make and very fun because you can add your own toppings and be as creative as you would like. I also like that the recipe only makes 12...the perfect amount for us!

Brownie Cupcakes
1 package brownie mix
1/2 cup canola oil
1/4 cup cranberry juice
2 large eggs
Toppings: chocolate chips, sprinkles, marshmallows, candycanes, pretzels, etc.
Powdered sugar (optional)
**I used mini chocolate chips, chocolate covered pretzels (coursely chopped), m&m's, and sprinkles.

1. Stir together first 4 ingredients until smooth. Spoon batter into muffin pan lined with paper/foil liners. Sprinkle with desired toppings. Batter will evenly fill 12 muffin cups.

2. Bake at 350 degrees for 20-25 minutes or until a wooden pick inserted in center of cupcakes comes out clean. Remove from pan, and cool on a wire rack. Sprinkle with powdered sugar, if desired.

Wondering what to do with all that leftover cranberry juice? Stay tuned for a very festive beverage recipe that is a favorite amongst our nation's top military leaders....don't ask me how I know this. Until then, go make the brownie cupcakes and eagerly await for this top secret recipe! :)